


Hardware components | ||||||
_ztBMuBhMHo.jpg?auto=compress%2Cformat&w=48&h=48&fit=fill&bg=ffffff) |
| × | 1 | |||
 |
| × | 1 | |||
 |
| × | 1 | |||
| × | 1 | ||||
| × | 1 | ||||
| × | 1 | ||||
| × | 1 | ||||
Software apps and online services | ||||||
 |
| |||||
Hand tools and fabrication machines | ||||||
| ||||||
This project uses my painting of flowers on the fabric, Arduino Nano as the microcontroller, components from CrazyCircuits and heart-rate monitor from DFRobot. Heart-rate is detected to control the blinking of LEDs embedded on the dress. The making process was first recorded on Hackaday.io. This projects also aims to demonstrate that when we design fitness and health products, we don't have to limit to wristbands. Why can't we embed sensors and monitors into beautiful gowns or daily wear?
1. Base layer
I painted my favorite flowers that are outside our apartment complex and printed it onto Minki fabric. The fabric is very smooth and soft. I wanted to make it into a dress based on the painting.
The first step is to make a base layer. I made a halter dress using tulle cut out of a pattern.
I love tulle and ribbons, especially when they are transparent.
2. Graphic placement
Now I need to design the placement of the graphics. I decided to cut the flowers and human figure out according to their shapes. Then stitch the parts together onto the tulle layer piece by piece. There's a lot of manual work.
3. LED test
I got some components from CrazyCircuits, including these large LEDs and coin ceil holders with large holes for sewing. They also have conductive tapes and a testing board, making the circuit test very easy.
I even used them to test a different project I'm working on that needed an external power supply.
I always test how thinks would look before construction. The LEDs should shine through the fabric. This is not the actual placement. I just needed to see how bright they show up.
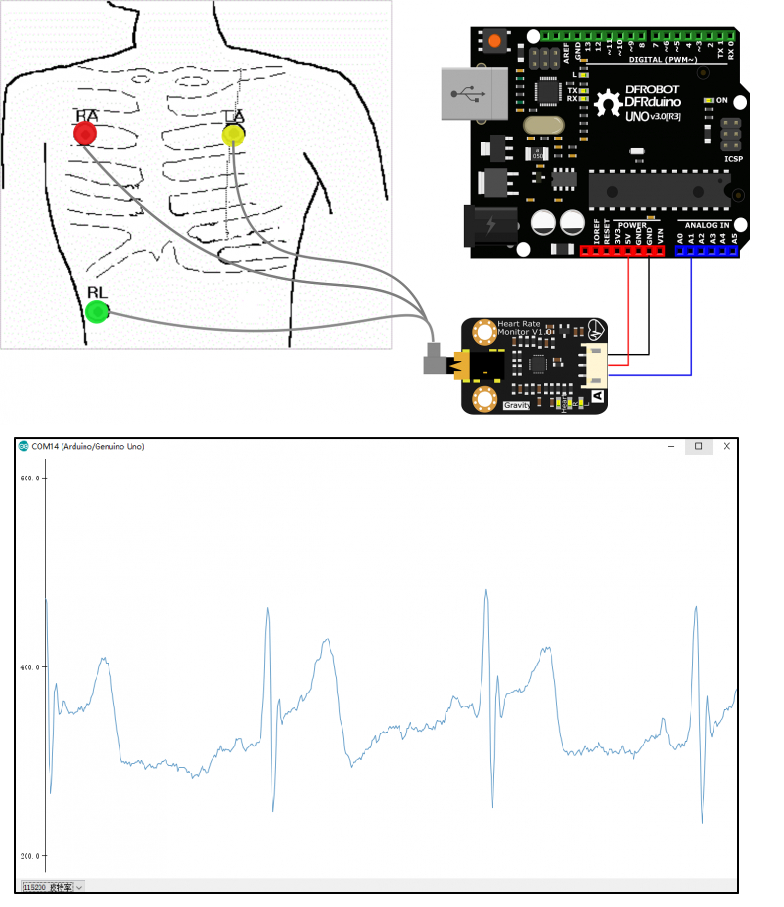
4. Heart-rate monitor
I wanted to use a pulse sensor that is small so I can attach it to my earlobe as an earring. But the reading was not stable and the pulse shape doesn't make sense.
So I changed to an analog ECG heart-rate monitor and it worked beautifully.
You have to attach the electros to three points on your body.
I used the same code from the pulse sensor and adjusted the target rate according to the output EKG displayed on the serial plotter.
Tweak the threshold value in the code to make the LEDs blink according to the peak values. As you can it, it has two main peaks every cycle. You can make the LEDs blink once per sharp primary peak or twice with both the sharp primary peak and the secondary peak.
Note, I used the Arduino Nano board on CrazyCircuits. It needs the Old ATmega328P Bootloader.
5. Soft circuit
Now that the circuit test is working, I need to sew it up using conductive threads. But I needed to determine where to place the components before sewing them.
All the components will be sandwiched between the painting and the tulle layers, so there won't be components showing. This means there's another interfacing layer needed where the components will be sewn on. How to know where to place the components on the interfacing layer?
I taped the LEDs onto where I want them to be on based on the graphics. Then I mark the locations on a piece of paper. I used a tulle as the interfacing layer. Since it's transparent, I could sew the LEDs on it with the paper together, therefore achieving transfer of the locations on the interfacing layer.
Sewing on tulle against a piece of paper is also a technique I used for the Twinkle Nail project. As tulles are very flimsy, the paper helps create rigidity. Peeling off the paper afterwards give a very nice flexible circuit.
Because tulles are porous (and the base layer is also made of tulle), the conductive thread may touch my skin. This may short the circuit. So I added another fabric to isolate the circuit from my skin. Now, you can insert the soft circuit in between the painting and base layers.
6. Hiding the circuit
The battery holder is a little big and heavy. It needed a pocket to be attached to the dress.
I've left gaps between the painting and base layers so that electronic components and wires can all be inserted and hidden under the painting layer.
7. Touch-up
I also wanted to light-up the tulle layers on the skirt with static lights. Because sometimes I may want to turn off the heart-rate-monitored LEDs so they don't constantly flash people but do want to keep some parts of the dress lit up.
For this, I used conductive tapes stuck on tulles and connected the tapes with the LEDs using conductive threads. This makes really nice soft circuits as the tapes are flexible and sticking them is much faster than sewing conductive threads.
Finally, the beautiful flower decorations and the zipper!
Further thoughts
I was recently invited to do a video with YiT (一条), a new online media in China on art and culture. This piece was featured and the video captured some of my previous rapid-prototyping work. We had a 1 h 30 min of interview on STEAM but only ~4mins could be included in the final report. I feel that more needs to be included to promote open-source, tech democratization, science and engineering, but these were considered to be too technical that could lose viewership... Consumerism in China has hindered the general public, to some extent, from knowing the maker culture ("If I can buy something, why should I DIY?" "'Extracurricular' toys for kids or innovation for school competitions."). Even though the article that came with this video on WeChat reached >100 K readers within the first few hours, many thought the handmade prototypes were products and completely missed the point of making, open-source, knowledge sharing and having a hobby while contributing to an industry.
Anyone in the tech-garment industry understands how difficult it is to push for an industrial revolution in this field: certain technologies we envision still requires scientific research; techs that exist may not be available for anyone to use; democratized techs need to be educated to the public, empowering creatives. It requires collaborations between all parts in the ecosystem. Traditional garment and high-tech companies need to learn from each other. There's been tremendous efforts by not enough people in education, open-source, creativity to achieve scaling. LEDs are the easiest to see - unfortunately mass population tends to focus on the trivial. But there needs to be more understanding that tech-garments offer an entrance to IoT, AI, edge computing and cloud, (buzzwords with truth) that humans define as the now and future. On top of all these, we must pursue lean manufacturing to reduce waste and pollution.
Thanks to YiT for the interview and reporting on the 10% of my work life. I'm especially grateful for Microsoft #MSFTGarage for providing a platform for employee-led innovations and making grassroots ideas possible.
Fun facts
In the middle of the project, Make: came to The Garage, Microsoft to do a Wearables Tech 101 workshop. I was the instructor and used this dress as an example of how to scale the skills we learn in the workshop to a real garment.
A few days after, Matrix Labs interviewed me in The Garage, where I briefly demonstrated the dress as well.
As well as during maker's Sunnyvale tour posted by Alex from Hackster.io


Comments